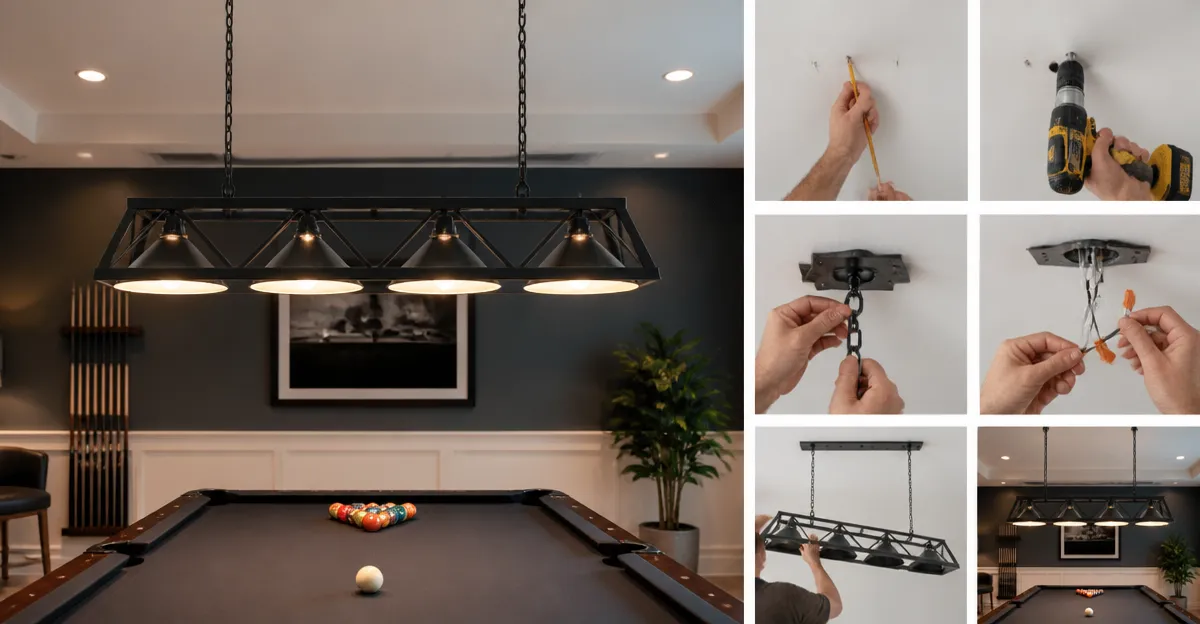
How to Install a Pool Table Light Fixture: Step-by-Step DIY Guide for Proper Height, Wiring & Mounting
Introduction
Installing a dedicated pool table light dramatically improves gameplay, reduces eye strain, and adds a professional aesthetic to any game room. This guide explains how to select the correct mounting height, safely wire the fixture, and securely mount the light. Readers will gain confidence to complete the project without professional assistance, while also understanding why certain products simplify the process.
Proper illumination is essential because uneven lighting creates shadows that can mislead a player about ball position. By following each step, one ensures that the light hangs directly above the playing surface, providing uniform brightness and eliminating glare.
The instructions are written for an intermediate DIY audience; basic electrical knowledge and standard hand tools are assumed. Safety remains paramount, and all local electrical codes should be consulted before beginning.
Throughout the article, specific pool‑table lighting products are recommended where they offer measurable advantages over generic alternatives.
What You’ll Need
- Voltage tester or multimeter
- Phillips and flat‑head screwdrivers
- Adjustable wrench or pliers
- Drill with appropriate bits (if ceiling lacks a pre‑installed mounting plate)
- Electrical tape and wire nuts (size 2–3)
- Safety goggles and insulated gloves
- Suitable light fixture (examples are linked in the steps below)
Step 1: Determine the Correct Hanging Height
The optimal distance between the tabletop and the light source is typically 30–36 inches. This range provides ample illumination while minimizing glare. Measure the distance from the ceiling to the table surface, then subtract the desired hanging height to calculate the chain length.
For a standard 8‑foot table, the Wellmet 59" Pool Table Light offers an adjustable 35.4‑inch chain, allowing precise positioning within the recommended range. Its 3‑light design distributes light evenly, and the premium metal construction resists rust, making it ideal for long‑term use.
Key specifications: Fixture dimensions 59.05" × 14.17" × 13.62", rating 4.8/5 from 983 reviews, price $219.99. The product does not include bulbs, enabling the user to select the preferred wattage.
Confirm the calculated chain length before proceeding to avoid repeated adjustments later.
Step 2: Gather Tools and Verify Safety Equipment
Before any electrical work, assemble all required tools on a stable workbench. Verify that the voltage tester is functional by testing a known live outlet.
Wear safety goggles to protect eyes from dust and insulated gloves to reduce the risk of electric shock. Having a flashlight with a long arm can be helpful when working near the ceiling.
If the ceiling is made of plasterboard, a stud finder will locate joists for secure mounting. Using the correct drill bit prevents unnecessary damage to the surrounding material.
Having all tools ready reduces interruptions and keeps the workflow efficient.
Step 3: Turn Off Power and Confirm Absence of Voltage
Locate the circuit breaker that supplies power to the room and switch it off. Use the voltage tester on the existing wiring to confirm that no voltage is present.
Do not rely solely on the breaker position; some panels have mislabeled circuits. Testing each wire ensures safety before any connection is made.
If the existing wiring is outdated (e.g., knob‑and‑tube), consider consulting a licensed electrician before proceeding.
Once the area is verified as dead, proceed to mount the fixture.
Step 4: Install the Mounting Bracket
Most pool table lights, including the Wellmet 3-Light Pool Table Light, come with a metal mounting plate that attaches directly to a ceiling joist. Position the plate at the calculated center point above the table, ensuring it aligns with the joist.
Secure the plate using the supplied lag bolts. Tighten them with an adjustable wrench, but avoid over‑torquing, which could strip the wood.
This particular model features a matte‑finished metal construction that blends with industrial décor, and it supports up to three E26 bulbs (maximum 60 W each). It is priced at $179.99 and holds a rating of 4.6/5 from 651 reviews, indicating reliable performance.
After the plate is firmly attached, double‑check that it is level using a small carpenter’s level.
Step 5: Hang the Fixture and Adjust Chain Length
Attach the fixture’s hanging hardware to the mounting plate, then slide the adjustable chain through the fixture’s eyelet. Pull the chain until the light sits at the previously determined height.
If additional length is required, the chain can be extended using the provided link rings. Conversely, excess length can be trimmed with bolt cutters, then the end re‑threaded through the clasp.
For a vintage aesthetic, the GZBtech Vintage 3-Light Pool Light offers a black‑metal finish and an adjustable chain that accommodates both flat and vaulted ceilings. Its UL listing provides added confidence for safety‑critical installations. Price $219.99, rating 4.6/5 from 375 reviews.
After hanging, ensure the fixture hangs straight; a slight tilt can cause uneven illumination.
Step 6: Wire the Fixture
Strip approximately ½ inch of insulation from each of the house wires (black, white, and ground). The fixture typically includes three wires: black (hot), white (neutral), and green or bare (ground).
Connect the black house wire to the black fixture wire using a wire nut, then repeat for the white wires. Secure the ground wire to the fixture’s ground screw, tightening it with a screwdriver.
Wrap each connection with electrical tape for added protection. The Wellmet 3-Light Pool Table Light (model B078PZDJYM) follows the same wiring scheme and is praised for its straightforward hard‑wiring process. It is priced at $185.99, rating 4.6/5 from 651 reviews.
After all connections are made, gently tug each wire to ensure the nuts are tight and will not loosen over time.
Step 7: Test the Light and Fine‑Tune Height
Restore power at the circuit breaker and switch on the light. Observe the illumination across the entire playing surface. Shadows should be minimal, and the light should appear evenly diffused.
If glare is present, consider installing a diffuser or selecting a lower‑wattage bulb. Adjust the chain length slightly if the light is too high or low; small changes of one to two inches can make a noticeable difference.
For energy‑efficient operation, the LuoliiTa 3-Light Pool Table Light includes a ceramic lamp head that dissipates heat effectively, allowing the use of LED bulbs up to 60 W. Its unique antler design adds visual interest while providing uniform light distribution. Price $116.99, rating 4.8/5 from 62 reviews.
Once satisfied, turn the light off and proceed to secure any loose chain ends.
Step 8: Secure the Installation and Clean Up
Fasten any remaining chain links and trim excess chain if necessary. Replace the ceiling cover plate if one was removed during mounting.
Dispose of packaging materials responsibly and store tools in a safe location. A tidy workspace reduces the likelihood of accidental damage to the new fixture.
Finally, document the installation date and the bulb type used; this information simplifies future maintenance.
Tips & Pro Tips
- Use LED bulbs rated at 2700–3000 K for a warm, game‑room friendly ambience.
- When mounting on a plaster ceiling, pre‑drill pilot holes to prevent cracking.
- Apply a small amount of silicone sealant around the mounting plate if the ceiling is in a humid environment, such as a bar.
- Consider installing a dimmer switch compatible with the fixture’s E26 bulbs to adjust brightness for different activities.
- Label the circuit breaker for easy identification in future electrical work.
Troubleshooting
Flickering Light: Verify that the bulb is securely screwed in and that the wire nuts are tight. Loose connections often cause intermittent power.
Insufficient Brightness: Ensure the bulb wattage does not exceed the fixture’s 60 W limit. Replace with a higher‑lumens LED if the current bulb is under‑powered.
Excessive Glare: Add a frosted diffuser or choose a bulb with a lower color temperature. Position the fixture directly above the center of the table to avoid side shadows.
Chain Slippage: Use a locking clasp or tighten the existing clasp screw. A secure chain prevents the fixture from descending over time.
Conclusion
By following this step‑by‑step guide, one can confidently install a pool table light fixture that delivers optimal illumination, enhances the aesthetic of the game room, and complies with safety standards. Proper height selection, careful wiring, and secure mounting are the pillars of a successful installation. Whether one chooses the premium Wellmet 59" Pool Table Light or the budget‑friendly LuoliiTa 3-Light Pool Table Light, the principles remain the same.
Enjoy clearer shots, reduced eye strain, and a professional look that will impress guests and elevate every game.
Products Mentioned in This Guide
Frequently Asked Questions
What is the ideal mounting height for a pool table light fixture?
Mount the light 30‑36 inches above the table surface to ensure even illumination without glare.
Do I need a licensed electrician to wire a pool table light?
If you have basic electrical knowledge and follow local codes, you can wire it yourself, but hiring a licensed electrician is safest for complex setups.
Which type of light bulb provides the best lighting for pool tables?
LED bulbs with 4000‑5000 lumens and a color temperature of 4000‑5000 K give bright, glare‑free illumination.
How do I securely mount the light fixture to avoid wobbling?
Use a sturdy ceiling joist or a metal mounting bracket, tighten all screws, and verify the fixture is level before tightening fully.
What common issues should I check if the light flickers after installation?
Inspect the wiring connections for loose terminals, ensure the circuit breaker is properly rated, and verify the bulb is compatible with the fixture.